
If you’ve recently removed acrylic nails and feel like your natural nails are thin, peeling, or barely holding on—you’re not imagining it. Acrylics can take a serious toll on nail health, especially after repeated applications and removal.
The good news?
With the right care, your nails can recover, grow, and look healthy again. It just takes patience, consistency, and a smarter approach to nail care.
This guide will walk you through exactly how to grow your nails after acrylics—what’s happening beneath the surface, what to avoid, and what actually helps your nails bounce back stronger.
Why Acrylics Damage Nails in the First Place
Acrylic nails themselves aren’t inherently bad—it’s the process around them that causes damage.
Here’s what usually happens:
-
Surface filing thins the nail plate so acrylics can adhere
-
Soaking in acetone strips natural oils and moisture
-
Aggressive removal can peel off layers of the nail
-
Repeated cycles prevent nails from fully recovering
After removal, nails are often:
-
Thin and bendy
-
Peeling in layers
-
Splitting at the tips
-
Dry, dull, or discolored
Understanding this helps set expectations—your nails aren’t “ruined,” they’re just injured and need time to heal.
Step 1: Give Your Nails a Break (Yes, Really)
One of the hardest—but most important—steps after acrylics is taking a break from enhancements.
That means:
-
No acrylics
-
No hard gels
-
No soak-off gels for a while
Even switching straight to gel polish can slow recovery if your nails are already compromised.
Think of it like this: you wouldn’t put makeup on irritated skin and expect it to heal. Nails are no different.
If you need something on your nails during this phase, opt for treatment-based products that protect while they repair.
Step 2: Focus on Repair, Not Length
Right after acrylics, the goal is repair, not growth.
Trying to grow long nails too soon often leads to:
-
More peeling
-
More breakage
-
Frustration that sends you back to acrylics
Instead, aim for:
-
Short, clean nails
-
Smooth edges
-
A strong foundation
Once the nail plate is healthy again, length will follow naturally.
Step 3: Strengthen With the Right Ingredients
Post-acrylic nails need support, not hardness.
This is where many people go wrong—using extremely hard nail strengtheners can actually make nails more prone to snapping.
What nails really need is:
-
Keratin to reinforce weakened layers
-
Flexible protection to prevent tearing
-
Moisture balance to stop peeling
A protein-rich treatment designed for damaged nails can make a noticeable difference in how nails look and feel—even before they grow out.
Look for formulas that:
-
Strengthen without over-hardening
-
Smooth ridges caused by acrylic removal
-
Improve the overall appearance of the nail
Step 4: Moisture Is Non-Negotiable
Dry nails break. Period.
After acrylics, nails are often severely dehydrated from acetone exposure. Reintroducing moisture is essential for growth.
Daily habits that help:
-
Applying cuticle oil or nail moisturizer every day
-
Massaging product into the nail plate and cuticle area
-
Avoiding harsh soaps without re-hydrating afterward
Moisture helps nails stay flexible, which is what prevents splits and peeling as they grow.
Step 5: Protect Nails From Everyday Damage
After acrylics, your nails are more vulnerable than usual. Small habits can either help or hurt recovery.
Do this:
-
Wear gloves when cleaning
-
Use your knuckle, not your nail, to open things
-
Keep nails short and softly filed
Avoid this:
-
Picking or peeling leftover product
-
Using nails as tools
-
Re-soaking in acetone too frequently
Protection doesn’t slow growth—it prevents setbacks.
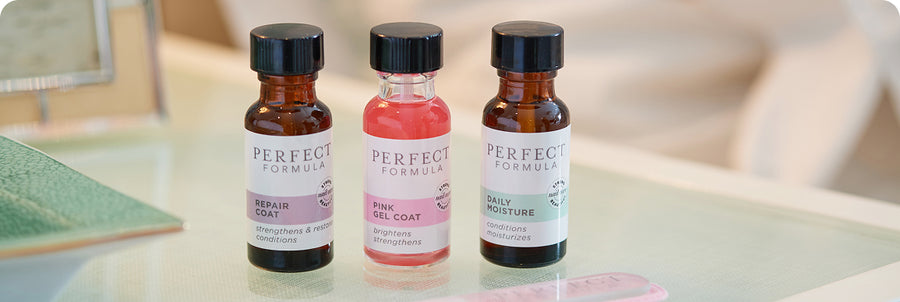
Step 6: Use a Repair-Focused Base Coat
One of the best ways to grow nails after acrylics is using a repairing base coat specifically designed for post-enhancement damage.
-
Fill in ridges caused by acrylic removal
-
Reinforce weak areas of the nail
-
Condition while protecting
-
Create a smooth surface (even without polish)
Look for formulas with:
-
Keratin
-
Biotin
-
Jojoba oil
-
Vitamin E
These ingredients help nails look better and function better while they grow.
Step 7: Keep a Simple Weekly Routine
Consistency beats intensity every time.
A simple weekly nail routine after acrylics might look like this:
-
Remove treatment gently once per week
-
Lightly file and shape
-
Reapply strengthening or repair treatment
-
Use cuticle oil daily
That’s it.
No soaking. No scraping. No complicated steps.
Step 8: Be Patient With the Grow-Out Phase
Here’s the part no one likes to hear—but everyone needs to.
Nails grow slowly.
On average:
-
Fingernails grow about 3 millimeters per month
-
It can take 3–6 months to fully grow out damaged nail
During this time, you may notice:
-
A visible line where healthy nail meets damaged nail
-
Improvement at the base before the tips
-
Gradual reduction in peeling and splitting
This is progress—even if it doesn’t feel dramatic day-to-day.
Step 9: Resist the Urge to “Cover It Up”
When nails look rough, the temptation is to cover them up with another set of acrylics or gels.
But layering enhancements on damaged nails:
-
Traps weakness underneath
-
Delays true recovery
-
Often leads to a longer cycle of damage
If you’ve committed to growing your natural nails, the fastest way forward is staying the course.
Step 10: Celebrate Small Wins
Growing nails after acrylics isn’t just physical—it’s mental.
Celebrate:
-
Fewer splits
-
Less peeling
-
A smoother nail surface
-
Nails that feel stronger week by week
These small improvements mean your nails are healing—even before length shows up.
Final Thoughts: Strong Nails Are Built, Not Rushed
Recovering from acrylics takes time, but it’s absolutely possible—and worth it.
With the right balance of:
-
Repair
-
Strength
-
Moisture
-
Protection
Your nails can grow back healthier, stronger, and more resilient than before.
Skip the quick fixes. Support your nails through the recovery process. And remember—strong nails don’t happen overnight, but they do happen with care and consistency.


